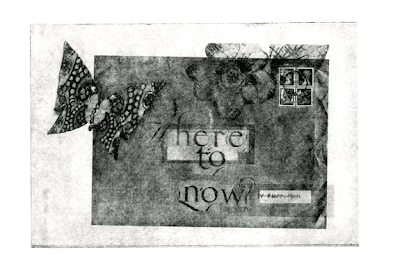
 This is the solar plate version of a digital collage, inked to make an intaglio print. Compared to the digital version, this is much softer (and of course, black and white). It resulted in some very interesting textures and retained most of the fine detail (although some was lost — mostly around the letter W in ‘where’, but that may be due to my inexperience at inking… I’ve done lots but don’t enjoy the sticky mess very much, consequently my heart’s not in it). The best part of intaglio printing is the embossed effect on the paper which is hard to show online. On one of the test prints, the butterfly is very tactile and the subtle texture in the fabric has come through beautifully.
Solar plate printing is an interesting process. Compared to traditional etching (intaglio printing), it’s much less labour intensive and far less hazardous chemically (at least to the printmaker who uses the plates – heaven knows what binding the polymer to the plate does to the poor people breathing the fumes at the factory). In traditional etching, you apply a mask to a lead or zinc plate and scratch an image through the mask. Everything that’s masked is protected. Then you dunk the plate into acid to ‘bite’ away at the unprotected metal and the image is etched into the plate. You grind ink into the grooves, wipe away the excess and then get a print by pressing the plate really hard between rollers. The result is more or less a white page with lines on it*. In traditional relief printing, you cut into the plate, and remove the parts you don’t want to print. Then you run a roller over the top without getting ink into the grooves and “pull” a print**. The result is a coloured page with white lines in it — in other words, sort of the opposite of a traditional etching.
A solar plate can give you, depending on how long you expose the plate and how much developing you allow, both a relief and an etched-style plate in one. It’s very quick to process and develop. The basic method is:
- Create a black image on a transparency (eg film or glass).
- OR draw or paint directly onto the solar plate.
- Put the transparency on the plate, expose it to sunlight — briefly, no more than 6 minutes. Everywhere the sun shines on it becomes hard, the bits that are drawn on or hidden by the lines on the transparency stay soft.
- Develop the plate in warm water. The hardened bits stay on, the soft bits wash away.
- Dry it off & let it finish hardening.
- Ink up the plate, as either an intaglio plate or a relief plate (or both! — inking in one colour & then rolling a different colour over the face of the plate)
- Print.
There’s lots more detail to this — you have to keep the transparency in close contact with the plate when exposing, different makes of plate behave differently, English weather is notoriously unreliable so it might be better to get a UV light box, etc. So many variables, you could spend a long time working out how to do this well. And it’s not cheap. The solar plates are quite pricey and it’s entirely possible to expose and ruin them just by accidentally leaving one lying around.
They’re also subject to accidents. The example below is one of Stuart’s, where the plate got rained on while it was outside for the “final hardening off”. (See Stuart’s site for his take on doing this kind of printmaking. I quite like the soft fuzzy spots (in my opinion, it’s the sort of happy accident that sometimes happens) but he wasn’t quite so keen on them.

Having said that, it was really interesting and much faster than preparing trad intaglio plates.
* This is very much over-simplifying the results to illustrate the point: etchings can be very dark, can have a wide range of tones etc. ** Printing either style is called ‘pulling’ a print, but it makes more sense when talking about relief printing.