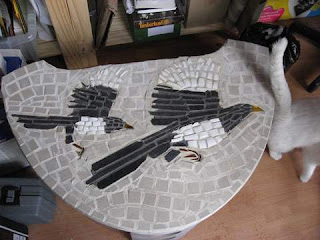
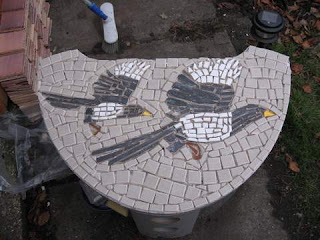
The magpies are very nearly complete – just a bit of cleaning left to do. Both the projects started around Christmas turned into hard work. The celtic horse caused me a lot of grief and wasted glass and still isn’t finished. The magpies, my first true mosaic project, have taught me many lessons, mostly about how not to do it.
Before grouting
Lesson 1. Adhesives
- Waterproof wall tile adhesive is not waterproof until it’s dry. So leaving an outdoor project outside uncovered in the rain & damp is not a good idea. Covering it with plastic doesn’t necessarily help either, because it traps moisture inside.
- Also, unlike the explicit instructions you get for laying field tiles (i.e., ordinary wall tiles), it’s best not to spread the adhesive on the substrate first. It seems to work much better to “butter” each piece individually and place them. At least it did on this surface, a relatively slick piece of furniture probably made from composite wood. Not varnished, but not matte either.
- Leaving an outdoor project unfinished in sub-zero temperatures causes waterproof adhesive to fail.
- Leaving an outdoor project unfinished inside an unheated workshop in sub-zero temperatures also causes waterproof adhesive to fail.
- Possibly using wall tile adhesive for the surface of a table was the big mistake … but my thinking was that it wasn’t going to receive any wear & tear from walking, it’s just an ornamental table top that is occasionally going to have a cat sitting on it, or possibly a BBQ platter set down on it. Perhaps floor adhesive would have held up better, or even whatever they use for swimming pools. But this was an on-the-cheap project and a learning experience, and the wall adhesive was left over from reparing the bathroom wall tiles.
Lesson 2. Grout
… and after grouting (and re-glueing all the bits that lifted after being frozen).
- Grout has only two consistencies: too dry (and then it crumbles) or too wet (and then it runs and leaves holes behind). I was using two different types of grout – Homebase own-brand brilliant white grout, left white and also with black pigment added; and Ultracolour in a shade called jasmine, a sort of beigey-brown. Each of these naturally mixed up differently. The Homebase instructions were good and detailed, but inaccurate – 35ml water to 100g powder wasn’t enough water but I always seemed to add just that little bit too much and it would turn instantly to gruel. The Ultracolour instructions were pointless for my purposes – mix the entire box in 2 and a half litres of water and stir. So the Homebase grout was way too liquid and no matter what I did to the Ultracolour it dried out within minutes and I was working with a sort of salt-dough consistency kind of mixture.

- When using different grout colours, do the dark one first and let it dry, otherwise it smears and/or drips (see “too liquid” above) all over the light colours. This is just the oppposite of how you think of mixing the colours – if you add dark pigment to light grout, then you have to completely clean the grout mix out of the container to do the light bits, but nonetheless, that seems to be the best approach.
- The close-up picture shows the three different grout colours: black (dark grey really), white on the body and “jasmine” on the wingtips and background. The jasmine grout dried pretty much OK, despite it being very grainy to work with.
- The too-liquid white and black grouts have left tiny holes that will need to be filled before I can leave it outdoors without worrying about water getting under and lifting the tiles. It’s quite obvious in the detail picture of the small bird’s wing.

- It remains to be seen whether the black pigment I used will stay black – actually a very dark grey. I had an old tube of student-grade ivory black watercolour and it coloured the grout nicely, but I don’t know if it will stay black exposed to the sun. I don’t think it matters that much. My alternative idea for pigment was black shoe polish and it’s interesting that someone in the very helpful Mosaics Addicts group recently suggested using black shoe polish over grout.
- It’s better to do it near a sink, it needs lots of clean water.
- Believe the books when they say to wear gloves to grout. It eats up the skin on your hands. And you do need to use your fingers to push the recalcitrant stuff down into the cracks because it’s dried out (see “too dry and then it crumbles, above”).

Funny, when I started grouting in the morning I thought, “this is kind of fun. It unifies the elements, it makes it look much better, it’s not that hard, what’s all the bitching about?” By the afternoon, I think I understood the bitching pretty darn well.


