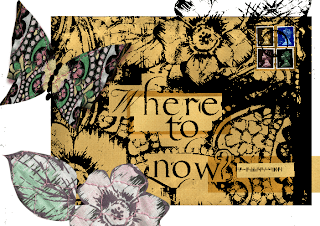
I was playing around with the scanner and this piece seemed to evolve out of some of the found objects. It was meant to be a thresholded image to use for solar plate printing tomorrow (more on that after the experiments!), but I don’t think it will work – it needs the colours to make sense & I don’t fancy making several plates.
It’s all done in Photoshop — lots of layers. The words are digitally cut & pasted from hand-lettering in a 1947 book, Anatomy of Lettering by Russell Laker, except for the question mark which is from the P22 Da Vinci font. The butterfly and flowers are from an old cosmetics bag. The brown envelope was from my accountant – I liked the way the stamps were nicely placed, each one a different colour.
I will probably make a greeting card out of this.
How to make a butterfly in Photoshop
- Cut one butterfly wing shape out of the “fabric” and paste it – this automatically creates a new layer.
- Duplicate the layer & flip it horizontally. Align the wings so they’re symmetrical.
- Merge the two wing layers.
- Copy the merged layer and flip it vertically to make the lower wings.
- Use the free transform tool to shrink and stretch the lower wings.
- Put a fuzzy drop shadow on the upper wings (I used the eyedropper to pick up the pink from the fabric for the shadow colour).
- Copy the drop shadow to the lower wings. Merge the two wing layers together and rotate it slightly (butterflies rarely fly straight).
- To make the body, make a new layer above the wings. Draw a little circle with the selection tool. Hold down the shift key and draw three or so more circles, all touching each other in a curvy line.
- Make sure the main colour is the one you want for the body, and while the circles are live use Alt+Enter (Windows) to fill the circles, or use the paintbrush
- Use a small diameter calligraphy brush in the same colour for the antennae … and it’s done.


