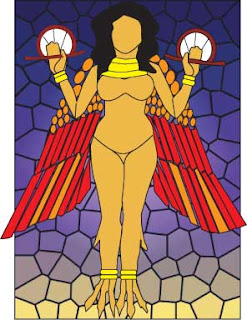
 This is a stained glass panel that I have been wanting to do for a long time. The finished size will be roughly A2 (42 x 59.4 cm, about 16.5 x 23″). She will be done using the copper foil technique, not lead.
I used Illustrator to make the pattern. I commissioned my favourite photographer to take some snaps of the original fired-clay panel in the British Museum. The photos went into a layer, then I used the pen tool to trace over the outlines by hand. I used many, many layers — one for the body, three layers for the hands and ring-and-wand combination, one for hair and so on. Using layers allows me to lock the parts I’m not working on and zoom in to do the fine details without worrying about accidentally moving outlines elsewhere.
When making a stained glass pattern, the two important things to remember are: (1) simplify (2) you can’t cut around a corner. By (2), I mean that the nature of glass allows you to cut curves and straight edges, but not to cut, for example, an ‘L’ shape in a single piece of glass.
This pattern is by no means complete or finalised enough to use to create a finished piece — there a re too many details that aren’t sufficiently worked out. You can see this easily around her owl feet. The talons have not been simplified enough and the background isn’t properly integrated into the design. Looking straight at the design, the left-most claw would require a V-cut in the glass, which just isn’t possible. Also, the ‘dew-claws’ on her legs will need to be cut as individual pieces.
The background was made in Photoshop using a gradient fill, navy blue at the top to yellow at the bottom on a rectangular panel. Then I applied, unsurprisingly, the ‘stained glass’ filter to create the cracks. After the drawing was complete in Illustrator, the gradient fill panel became the lowest layer in the set. That’s why the details are incomplete around her feet — the background and the pattern were done separately and then just plonked together.
The incompleteness in the pattern also applies to the small rounded oblong pieces in the top part of the wings. They will not be cut glass, but will be made from the quaintly-named ‘blobs’. These are rounded glass pebbles with a flat bit on the back (a nice touch, it keeps them from rolling away like marbles when you’re working). They vary in size, so they will just be placed as tightly as I can, then the tops of the ‘feathers’ will have to be cut in to fit. Most stained glass artists don’t work this way, i.e. making it up as you go along, but I’m comfortable with that. My work would no doubt be better if I was more disciplined and worked out all the details properly but that’s the way I work. No point fighting my nature now.
One other aspect of the pattern deserves a mention. The image here is shorter and wider than the original. After faithfully tracing Erishkigal (although I did leave off her antler-crown in the interests of simplicity), the individual body parts (especially the feathers) were too thin to cut in glass. Actually, not so much too thin to cut as too thin to foil properly — a few millimetres on all sides of the glass is taken up by the very dense copper foil and solder, so there wouldn’t be much visible glass left. Defeats the point. So, using the mighty power of resizing and distortion in Illustrator, I squashed, flattened and stretched her. A side effect of the distortion was a monumental increase in wing size, which I found attractive so I kept them large. Wings on a human body would have to be pretty big anyway, we’re not particularly aerodynamic and our bones are too heavy to fly.
Sadly, I’ve also had to leave out the lions and the owls. There just isn’t enough room for everything.
I have also used the Queen of the Night image in printmaking. For more information about that and a link to the original Ereshkigal (aka Lilith or possibly Ishtar) at the Museum, see my collagraph series.


